Creating a Scheduled Profile
Perform file transfer tasks on a schedule without manually starting them. You can use Scheduled Transfers to perform file transfers at times when network traffic is light, or to be sure that your files are always up to date.
A scheduled profile automatically starts any Automated Transfer profile at your desired time. You can schedule an Automated Transfer Profile while it is being created, or add schedule details to the existing Automated Transfer Profile. Scheduling the same automated transfer more than once is also possible. For instance, you could schedule a transfer daily at a specific time as well as each time when the program starts.
The transfer tasks can be scheduled to be a one-time event, or take place daily, weekly or monthly. Also using On Application launch, you can run the schedule each time the program starts. In addition, with the help of On Folder change, schedule will be invoked when any change occurs to the folder.
When specifying the action rules for Automated Transfer profile, you can click Configure button for the Schedule.

Schedule Name: You can specify a name for the schedule. This will avoid any confusion if you are scheduling multiple automated profiles.
Select the Type of Schedule:
Perform transfer: You can configure the following schedule types:
Note: By default, all the options are selected and Auto FTP Manager will monitor the folder for any of the above changes. You can also introduce waiting period after the change is made with the help of Wait {N} minutes before starting transfer option.
-
-
One Time: If you schedule once, you have to specify the Start Date and Time which is in a 24 hour format. The Date box has a down arrow button. Clicking on it opens a calendar from which you can choose the date to begin the schedule. Expire date and time is not provided for One time schedule type. Because this type of schedule will automatically expire after it has been invoked at the specified time.
-
Daily: Specify the Start Date and time and Expire Date and Time in a 24 hour format. By default, the selected scheduled actions will be repeated after every 1 day. You can also choose to repeat the schedule on minute interval or hourly basis. When Expire date and time is specified then the schedule will stop invoking after the specified time.
-
Weekly: This is the most flexible option. In the Select Weekday(s) section, you can select particular days in the week by checking the appropriate options. You can select multiple days of the week. Choose a start date and time from the Start date and time drop-down menu. You can choose to repeat the schedule after specific time using Repeat after every and also specify the duration for which the schedule should run. You can also select Expire date and time option to stop invoking the schedule after the specified time.
-
Monthly: Schedule will be performed on the selected months. You can choose days of the month or days of the week for performing the transfer.
-
On Application launch: Schedule will be performed every time you launch Auto FTP Manager. You need to specify the Start date, after which the schedule will be invoked. With the help of Expire date, you can stop the schedule from running again.
-
On Folder change: Auto FTP Manager monitors the selected folder for any change. Once Auto FTP Manager is launched and any modification is encountered then On Folder change schedule will be invoked. Following are the changes that can be monitored:
-
Additional Settings: You do not have to worry about your scheduled transfer even if the windows is logged off at the scheduled time. Just enable the option Login to run the schedule even if your system is Logged Off. It allows the profile to run at the scheduled time. When you enable this option, you need to specify Windows password.
Scheduler
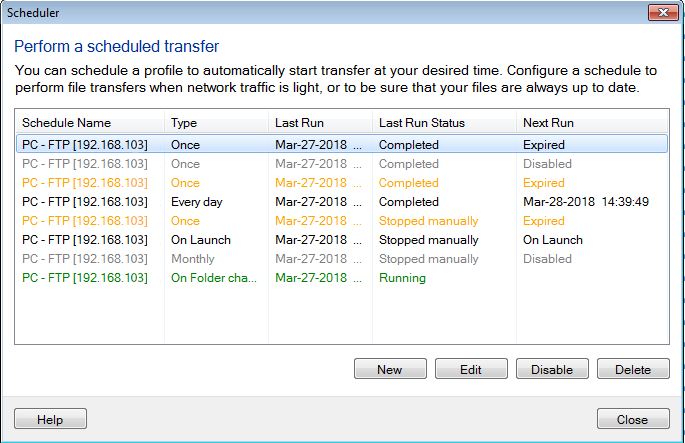
Scheduler helps you to view the details of the schedules while creating or editing automated transfer profile. This is useful to see which schedules are already configured for this profile, type of schedule, last run and next run status.
 .
.
Schedule Overview page

Schedule Overview page helps you to view the status and manage all the schedules that are currently added in the application. Click on the schedule from Schedules section in Connection Profile panel and the respective schedule will be selected in the Schedule overview page, if it is not running.
You can Add, Edit a schedule according to your need. If you don't want a schedule to run at specified time, either Disable (when schedule is not running) it or Stop it (when schedule is running). To remove the schedule from application, select Delete. You can also View Report to get detailed information about the transferred files.
Schedule status color codes
-
Green: Schedule is currently running
-
Orange: Schedule is Expired
-
Grey: Schedule is Disabled
-
Black: Schedule is Active
