Highlight Your Presentation with Mouse Effects
Drawing the viewers’ attention to a particular part of the screen may be essential when you want to explain a diagram or deal with complex, information-dense material. My Screen Recorder Pro captures the mouse cursor when you point and click while making a screen recording but it can do a lot more. You can select from a variety of mouse cursors from a pre-set list or create your own. Use special mouse effects in different colors, shapes and sizes to let the viewer know when you click the mouse buttons.
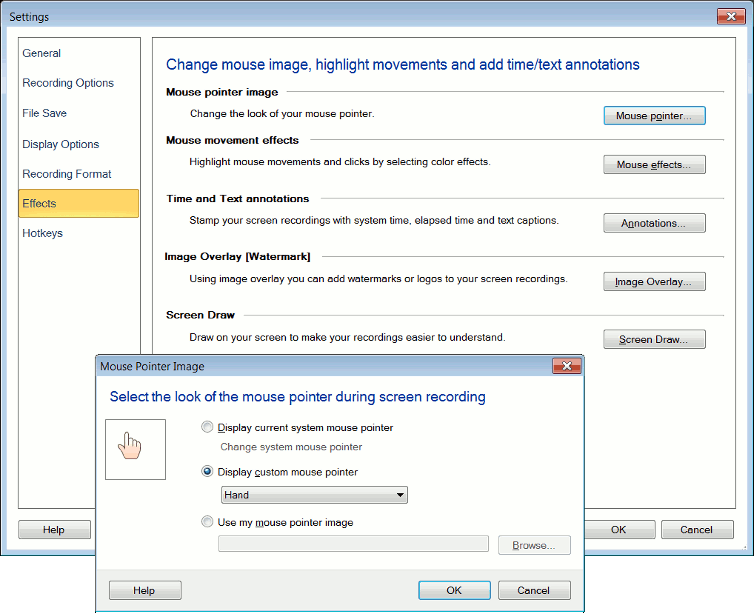
The Mouse Image and Mouse Effects features put important portions of the screen “under a spotlight”. You can control them by clicking on the Tools menu > Settings > Effects tab.

To record the mouse cursor, make sure that the Capture mouse cursor while recording option is checked. Unless you change the Mouse Image, you will see the default cursor image during playback. Click on the Mouse Image button to choose a custom cursor from the list of the ones available: Pen, Hand, Arrow or Pencil. This allows you to use a mouse image that suits the tone of the material being recorded or lends a unique and personalized appeal to the recording. You can also use any .ICO file as a custom mouse cursor.
The Mouse Image feature adds aesthetic appeal, or gives your work a personal touch. Mouse Effects is more practical. Applying effects can be useful when mouse clicks need to be highlighted, and when the viewer needs to easily identify whether the left or right mouse button is being used. This may come in handy when working with software applications, where you need to clearly show what to click and how.

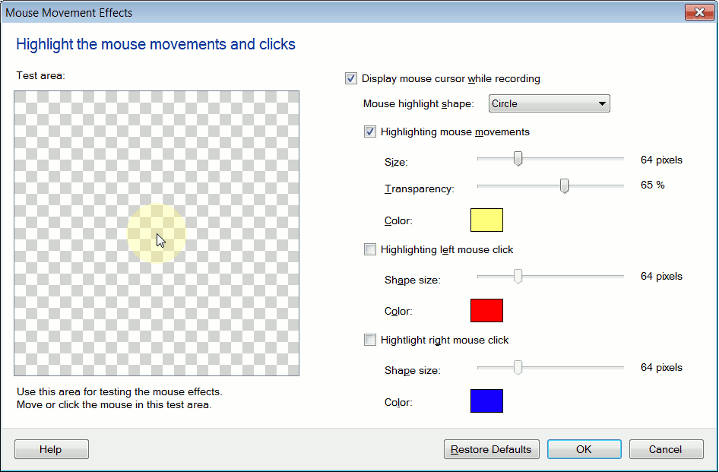
You can emphasize mouse movements, and visually indicate left and right mouse button clicks, by changing the Mouse Effects options. Click on the Tools menu > Settings > Effects tab > Mouse Effects. For each setting type, you select the Shape, Shape Size and Color. A rectangular preview box for each of these options shows you how exactly the effect would look like.
The image given above shows you the default settings for Mouse Effects.
The Highlight mouse movements option surrounds the mouse pointer with a geometric shape (Circle, Ellipse, Square or Rectangle). You can choose to highlight the left mouse click, the right mouse click or both. To distinguish the left from the right mouse click, you can set different colors and sizes for each click. You can use the test area to test and confirm the effects' settings. You can enable and disable the mouse highlights by clicking the Effects menu and selecting or deselecting the mouse highlight options. The mouse effects will appear when you play back your recording. They will not appear while you are creating the recording. Drag the Shape size slider to adjust the size of the highlight. Click the Color button to change the color of the highlight. You can select from basic or custom colors.
Focusing your viewer's attention on that important part of your recording becomes more creative and effective with My Screen Recorder Pro. Not only can you change the look of your mouse cursor, you can also light up the area you point to. The viewer can clearly differentiate between the right and left mouse clicks. Be sure that the right part of the screen is in the limelight!
